Removing plastic shell from USB audio device

-
Kilren

- Posts: 574
- Joined: Wed May 11, 2016 4:40 pm
- Location: Washington, USA
- Has thanked: 35 times
- Been thanked: 84 times
Re: Removing plastic shell from USB audio device
Sledgehammer!Ganreizu wrote:My USB audio device came in today and i'm trying to get the plastic shell off so i can expose the board. Anyone have any tips for doing this?
-
wermy

- Site Admin
- Posts: 1346
- Joined: Tue May 03, 2016 8:51 pm
- Has thanked: 620 times
- Been thanked: 1322 times
- Contact:
Re: Removing plastic shell from USB audio device
Which one did you get exactly? I recently did this with a tiny USB sound card as well. I turned it sideways, put a pair of pliers around it over the seam, and gently applied more and more pressure until I heard the plastic start to pop at the seam. A little scary but it easily enough. 


Re: Removing plastic shell from USB audio device
I got this guy:wermy wrote:Which one did you get exactly? I recently did this with a tiny USB sound card as well. I turned it sideways, put a pair of pliers around it over the seam, and gently applied more and more pressure until I heard the plastic start to pop at the seam. A little scary but it easily enough.
http://www.amazon.com/External-Adapter- ... ge_o00_s00
I'm worried about breaking the board inside if i do that. o.o Should i be worried about that?
-
Kilren
- Posts: 574
- Joined: Wed May 11, 2016 4:40 pm
- Location: Washington, USA
- Has thanked: 35 times
- Been thanked: 84 times
Re: Removing plastic shell from USB audio device
I take it that you didn't like the sledgehammer option? Yeah, just be slow and careful. I tend to use a jeweler's flathead screwdriver and slowly work the tip in and twist and turn and pry. It'll eventually give. Just be patient and work slow.Ganreizu wrote:
I'm worried about breaking the board inside if i do that. o.o Should i be worried about that?

Re: Removing plastic shell from USB audio device
Can you post a picture? What I did with the Sabrent is I used the smallest flat head screw driver and pried it along the edge of the metal USB plug. Then should be easy from there.
Re: Removing plastic shell from USB audio device
I got it! Thanks guys. :3 The flathead screw driver did the trick, i was just doing it from the wrong end i guess lol.
Not sure what to do about those buttons...Hopefully they can come off and i can hook it up to a potentiometer?chiz wrote:Can you post a picture? What I did with the Sabrent is I used the smallest flat head screw driver and pried it along the edge of the metal USB plug. Then should be easy from there.
- IMG_1883.JPG (858.3 KiB) Viewed 8694 times
Re: Removing plastic shell from USB audio device
There you go! 
As far as the buttons are concerned, I don't think you can use a variable resistor / potentiometer (pot) for this bec. the buttons are "digital". One way to still use a pot is set the volume to maximum level using the buttons, and then control the volume using the pot.
If you're fine with not using a pot however, you can wire push buttons over the original button's solder points then have the push button routed and exposed out of the shell and reuse those "vol up" and "vol down" buttons. Will not look like stock GB though if you go this route.
I personally find the board too big for this project that's why opted to the smallest C-Media-based USB audio dongle I can find. Here's a picture of it from my build log. See it's half the size of the Teensy and Powerboost?
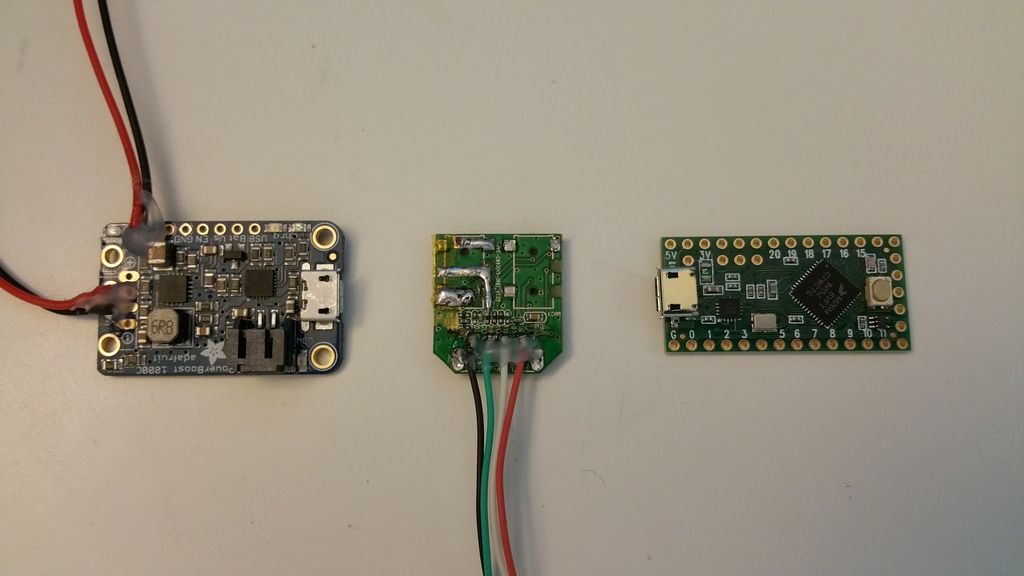
If I were you, I'll just keep this dongle for another project where you have more room and can make use of the buttons. For the GBZ, you don't really need those buttons which adds to the footprint.
As far as the buttons are concerned, I don't think you can use a variable resistor / potentiometer (pot) for this bec. the buttons are "digital". One way to still use a pot is set the volume to maximum level using the buttons, and then control the volume using the pot.
If you're fine with not using a pot however, you can wire push buttons over the original button's solder points then have the push button routed and exposed out of the shell and reuse those "vol up" and "vol down" buttons. Will not look like stock GB though if you go this route.
I personally find the board too big for this project that's why opted to the smallest C-Media-based USB audio dongle I can find. Here's a picture of it from my build log. See it's half the size of the Teensy and Powerboost?
If I were you, I'll just keep this dongle for another project where you have more room and can make use of the buttons. For the GBZ, you don't really need those buttons which adds to the footprint.
Re: Removing plastic shell from USB audio device
Hmm it's a tough decision because i know i can get two small push buttons to fit in the volume wheel area (with some minor case adjustment), but a potentiometer would probably feel better.
I won't be working with audio for a long while so i'll likely end up doing whatever will let me use a potentiometer. Guess i'll order the one you have.
I won't be working with audio for a long while so i'll likely end up doing whatever will let me use a potentiometer. Guess i'll order the one you have.
Re: Removing plastic shell from USB audio device
Word of warning though: I find these USB audio boards have very thin copper layer (compared to the RPi) and it's likely to come loose when you desolder the 3.5mm terminals. Be careful!Ganreizu wrote:Hmm it's a tough decision because i know i can get two small push buttons to fit in the volume wheel area (with some minor case adjustment), but a potentiometer would probably feel better.
I won't be working with audio for a long while so i'll likely end up doing whatever will let me use a potentiometer. Guess i'll order the one you have.
What I did is I covered board with copper tape and covered it with soldering lead and re-routed the solder points out of the original solder points where the terminals where. This way, they won't get "disturbed" when I solder my connections on the edge.
Who is online
Users browsing this forum: No registered users and 1 guest