Hello everybody!
I bought a kit off ebay (see attached photo)
I have a 4 button PCB board. I was just wondering a few things as I have tried finding this info in other threads and site with no luck...
I found a wiring diagram for a 2 button which I have attached below.
I found many great tutorials on the Helder but not for my PCB board
But My question is:
1. How do I wire the gpio and the PCB board especially with the 2 extra buttons not seen in my attachment?
2. How do I add L/R Buttons. My board has 2 extra GRD (ground) holes is this where I can attach 2 more buttons like my L/R Buttons?
3. What do I need for sound? what kinda board?
4. Do I need any more chips, parts for my board to get it running? I so far have the pcb board and button inlays, the miscellaneous switches and potentiometers, the battery, PowerBoost charger, Raspberry Pi Zero, USB Micro-B Breakout Board and screen.
5. How do I wire the rest? Screen board and battery? ( the items haven't arrived yet...)
6. Is there a diagram or a good tutorial for those who have the simpler cheaper board?
All advice is greatly appreciated!
Thanks
Cheaper PCB
Cheaper PCB
- Attachments
-
- My kit
- $_57.jpg (182.1 KiB) Viewed 9467 times
-
- wiring for 2 button gpio
- Figure-6_lightbox.png (148.54 KiB) Viewed 9467 times
-
rodocop

- Posts: 1723
- Joined: Mon Aug 22, 2016 3:14 pm
- Location: Saskatchewan
- Has thanked: 606 times
- Been thanked: 608 times
Re: Cheaper PCB
1.) here is how to wire the PCB to GPIO pins of the pi
viewtopic.php?t=57
2.) L and R are covered in the guide, just wire them to the GPIO's as well. You can ground them on that PCB if you want on those extra pads
3.)For sound you will need an amplifier (and possibly a low pass filter). I used this one:
https://www.adafruit.com/product/2130
(you can find cheaper alternatives on ebay)
you can also choose to do USB audio and buy a USB sound card instead. You can also add a 5 pin volume wheel or headphones. You can also adjust the volume in game (by setting up some hotkeys) if you don't want to get a volume wheel.
4.) You list seems good, might want to add a screen cover (handheld legend, kitchbent, gooyes etc...) If you choose USB audio you might want to add a usb hub, since it will use the one usb on the pi zero.
5.) How to wire, have a look at wermy's guides and the forum posts. They may not show the exact items you have but wiring will be very similar.
6.) You can check my signature, 2 of my builds used boards like that. And like I said check the forums, and wiki.
http://www.sudomod.com/wiki/index.php?title=Main_Page
_____________________________________________________
My Minty Pi builds:
http://www.sudomod.com/forum/viewtopic.php?f=32&t=3628
My GBZ builds:
http://www.sudomod.com/forum/viewtopic. ... 813#p50813
My modded DMG-01's:
http://www.sudomod.com/forum/viewtopic.php?f=13&t=2696
My NESpi:
http://www.sudomod.com/forum/viewtopic.php?f=13&t=2941
My Gaboze Pocaio's
https://sudomod.com/forum/viewtopic.php?f=13&t=6063
Re: Cheaper PCB
https://www.youtube.com/watch?v=ItWIYcD6jas
Thanks so much buddy
I have been searching high and low believe it or not for a few days and it was starting to get really overwelming
Thanks again
Thanks so much buddy
I have been searching high and low believe it or not for a few days and it was starting to get really overwelming
Thanks again
-
rodocop
- Posts: 1723
- Joined: Mon Aug 22, 2016 3:14 pm
- Location: Saskatchewan
- Has thanked: 606 times
- Been thanked: 608 times
Re: Cheaper PCB
Not a problem, there are always people willing to help here. Post whenever you need a hand and someone will be around to help.lewsidius wrote: ↑Wed Jul 26, 2017 10:35 amhttps://www.youtube.com/watch?v=ItWIYcD6jas
Thanks so much buddy
I have been searching high and low believe it or not for a few days and it was starting to get really overwelming
Thanks again
_____________________________________________________
My Minty Pi builds:
http://www.sudomod.com/forum/viewtopic.php?f=32&t=3628
My GBZ builds:
http://www.sudomod.com/forum/viewtopic. ... 813#p50813
My modded DMG-01's:
http://www.sudomod.com/forum/viewtopic.php?f=13&t=2696
My NESpi:
http://www.sudomod.com/forum/viewtopic.php?f=13&t=2941
My Gaboze Pocaio's
https://sudomod.com/forum/viewtopic.php?f=13&t=6063
My Minty Pi builds:
http://www.sudomod.com/forum/viewtopic.php?f=32&t=3628
My GBZ builds:
http://www.sudomod.com/forum/viewtopic. ... 813#p50813
My modded DMG-01's:
http://www.sudomod.com/forum/viewtopic.php?f=13&t=2696
My NESpi:
http://www.sudomod.com/forum/viewtopic.php?f=13&t=2941
My Gaboze Pocaio's
https://sudomod.com/forum/viewtopic.php?f=13&t=6063
Re: Cheaper PCB
Thanks
I've noticed you helping others too on other threads I really do appreciate your help and the help of others like you, thanks to everyone constant support. Forums are Amazing! Thanks again!
I've noticed you helping others too on other threads
-
rodocop
- Posts: 1723
- Joined: Mon Aug 22, 2016 3:14 pm
- Location: Saskatchewan
- Has thanked: 606 times
- Been thanked: 608 times
Re: Cheaper PCB
One other thing I noticed, you might want to get some buttons wells for the X and Y buttons. I think you can get some 3d printed ones from wermy in the market, or get the STL files and have them printed for you (3d hubs etc) or you can do it with your own printer (if you have one). I recommend this screen bracket designed by hoolyhoo, which has the button wells incorporated. Hard to say if it will line up with the pre drilled holes though:
http://market.sudomod.com/3d-printed-gbz-button-wells/
or
http://www.sudomod.com/forum/viewtopic.php?t=2553
http://market.sudomod.com/3d-printed-gbz-button-wells/
or
http://www.sudomod.com/forum/viewtopic.php?t=2553
_____________________________________________________
My Minty Pi builds:
http://www.sudomod.com/forum/viewtopic.php?f=32&t=3628
My GBZ builds:
http://www.sudomod.com/forum/viewtopic. ... 813#p50813
My modded DMG-01's:
http://www.sudomod.com/forum/viewtopic.php?f=13&t=2696
My NESpi:
http://www.sudomod.com/forum/viewtopic.php?f=13&t=2941
My Gaboze Pocaio's
https://sudomod.com/forum/viewtopic.php?f=13&t=6063
My Minty Pi builds:
http://www.sudomod.com/forum/viewtopic.php?f=32&t=3628
My GBZ builds:
http://www.sudomod.com/forum/viewtopic. ... 813#p50813
My modded DMG-01's:
http://www.sudomod.com/forum/viewtopic.php?f=13&t=2696
My NESpi:
http://www.sudomod.com/forum/viewtopic.php?f=13&t=2941
My Gaboze Pocaio's
https://sudomod.com/forum/viewtopic.php?f=13&t=6063
Re: Cheaper PCB
Thanks Yeah I got the button wells ordered  Im Just gonna order the amp chip now
  I cant believe its only 4 bucks! How much do your builds usually run you?
-
rodocop
- Posts: 1723
- Joined: Mon Aug 22, 2016 3:14 pm
- Location: Saskatchewan
- Has thanked: 606 times
- Been thanked: 608 times
Re: Cheaper PCB
I think most of mine were in the 150-200 CAD range. If you don't mind waiting you can get some really cheap components from China. I've found it's always better to order more than you need, just in case you want to build more and do not want to wait for shipping again.
I live in Canada, so i generally don't order from adafruit, shipping is quite high and our dollar is quite low, so things get pretty expensive for me...
I live in Canada, so i generally don't order from adafruit, shipping is quite high and our dollar is quite low, so things get pretty expensive for me...
_____________________________________________________
My Minty Pi builds:
http://www.sudomod.com/forum/viewtopic.php?f=32&t=3628
My GBZ builds:
http://www.sudomod.com/forum/viewtopic. ... 813#p50813
My modded DMG-01's:
http://www.sudomod.com/forum/viewtopic.php?f=13&t=2696
My NESpi:
http://www.sudomod.com/forum/viewtopic.php?f=13&t=2941
My Gaboze Pocaio's
https://sudomod.com/forum/viewtopic.php?f=13&t=6063
My Minty Pi builds:
http://www.sudomod.com/forum/viewtopic.php?f=32&t=3628
My GBZ builds:
http://www.sudomod.com/forum/viewtopic. ... 813#p50813
My modded DMG-01's:
http://www.sudomod.com/forum/viewtopic.php?f=13&t=2696
My NESpi:
http://www.sudomod.com/forum/viewtopic.php?f=13&t=2941
My Gaboze Pocaio's
https://sudomod.com/forum/viewtopic.php?f=13&t=6063
Re: Cheaper PCB
I'm in Toronto and I find the same thing about the shipping as well  Who do you find best to order from for us Canadians?
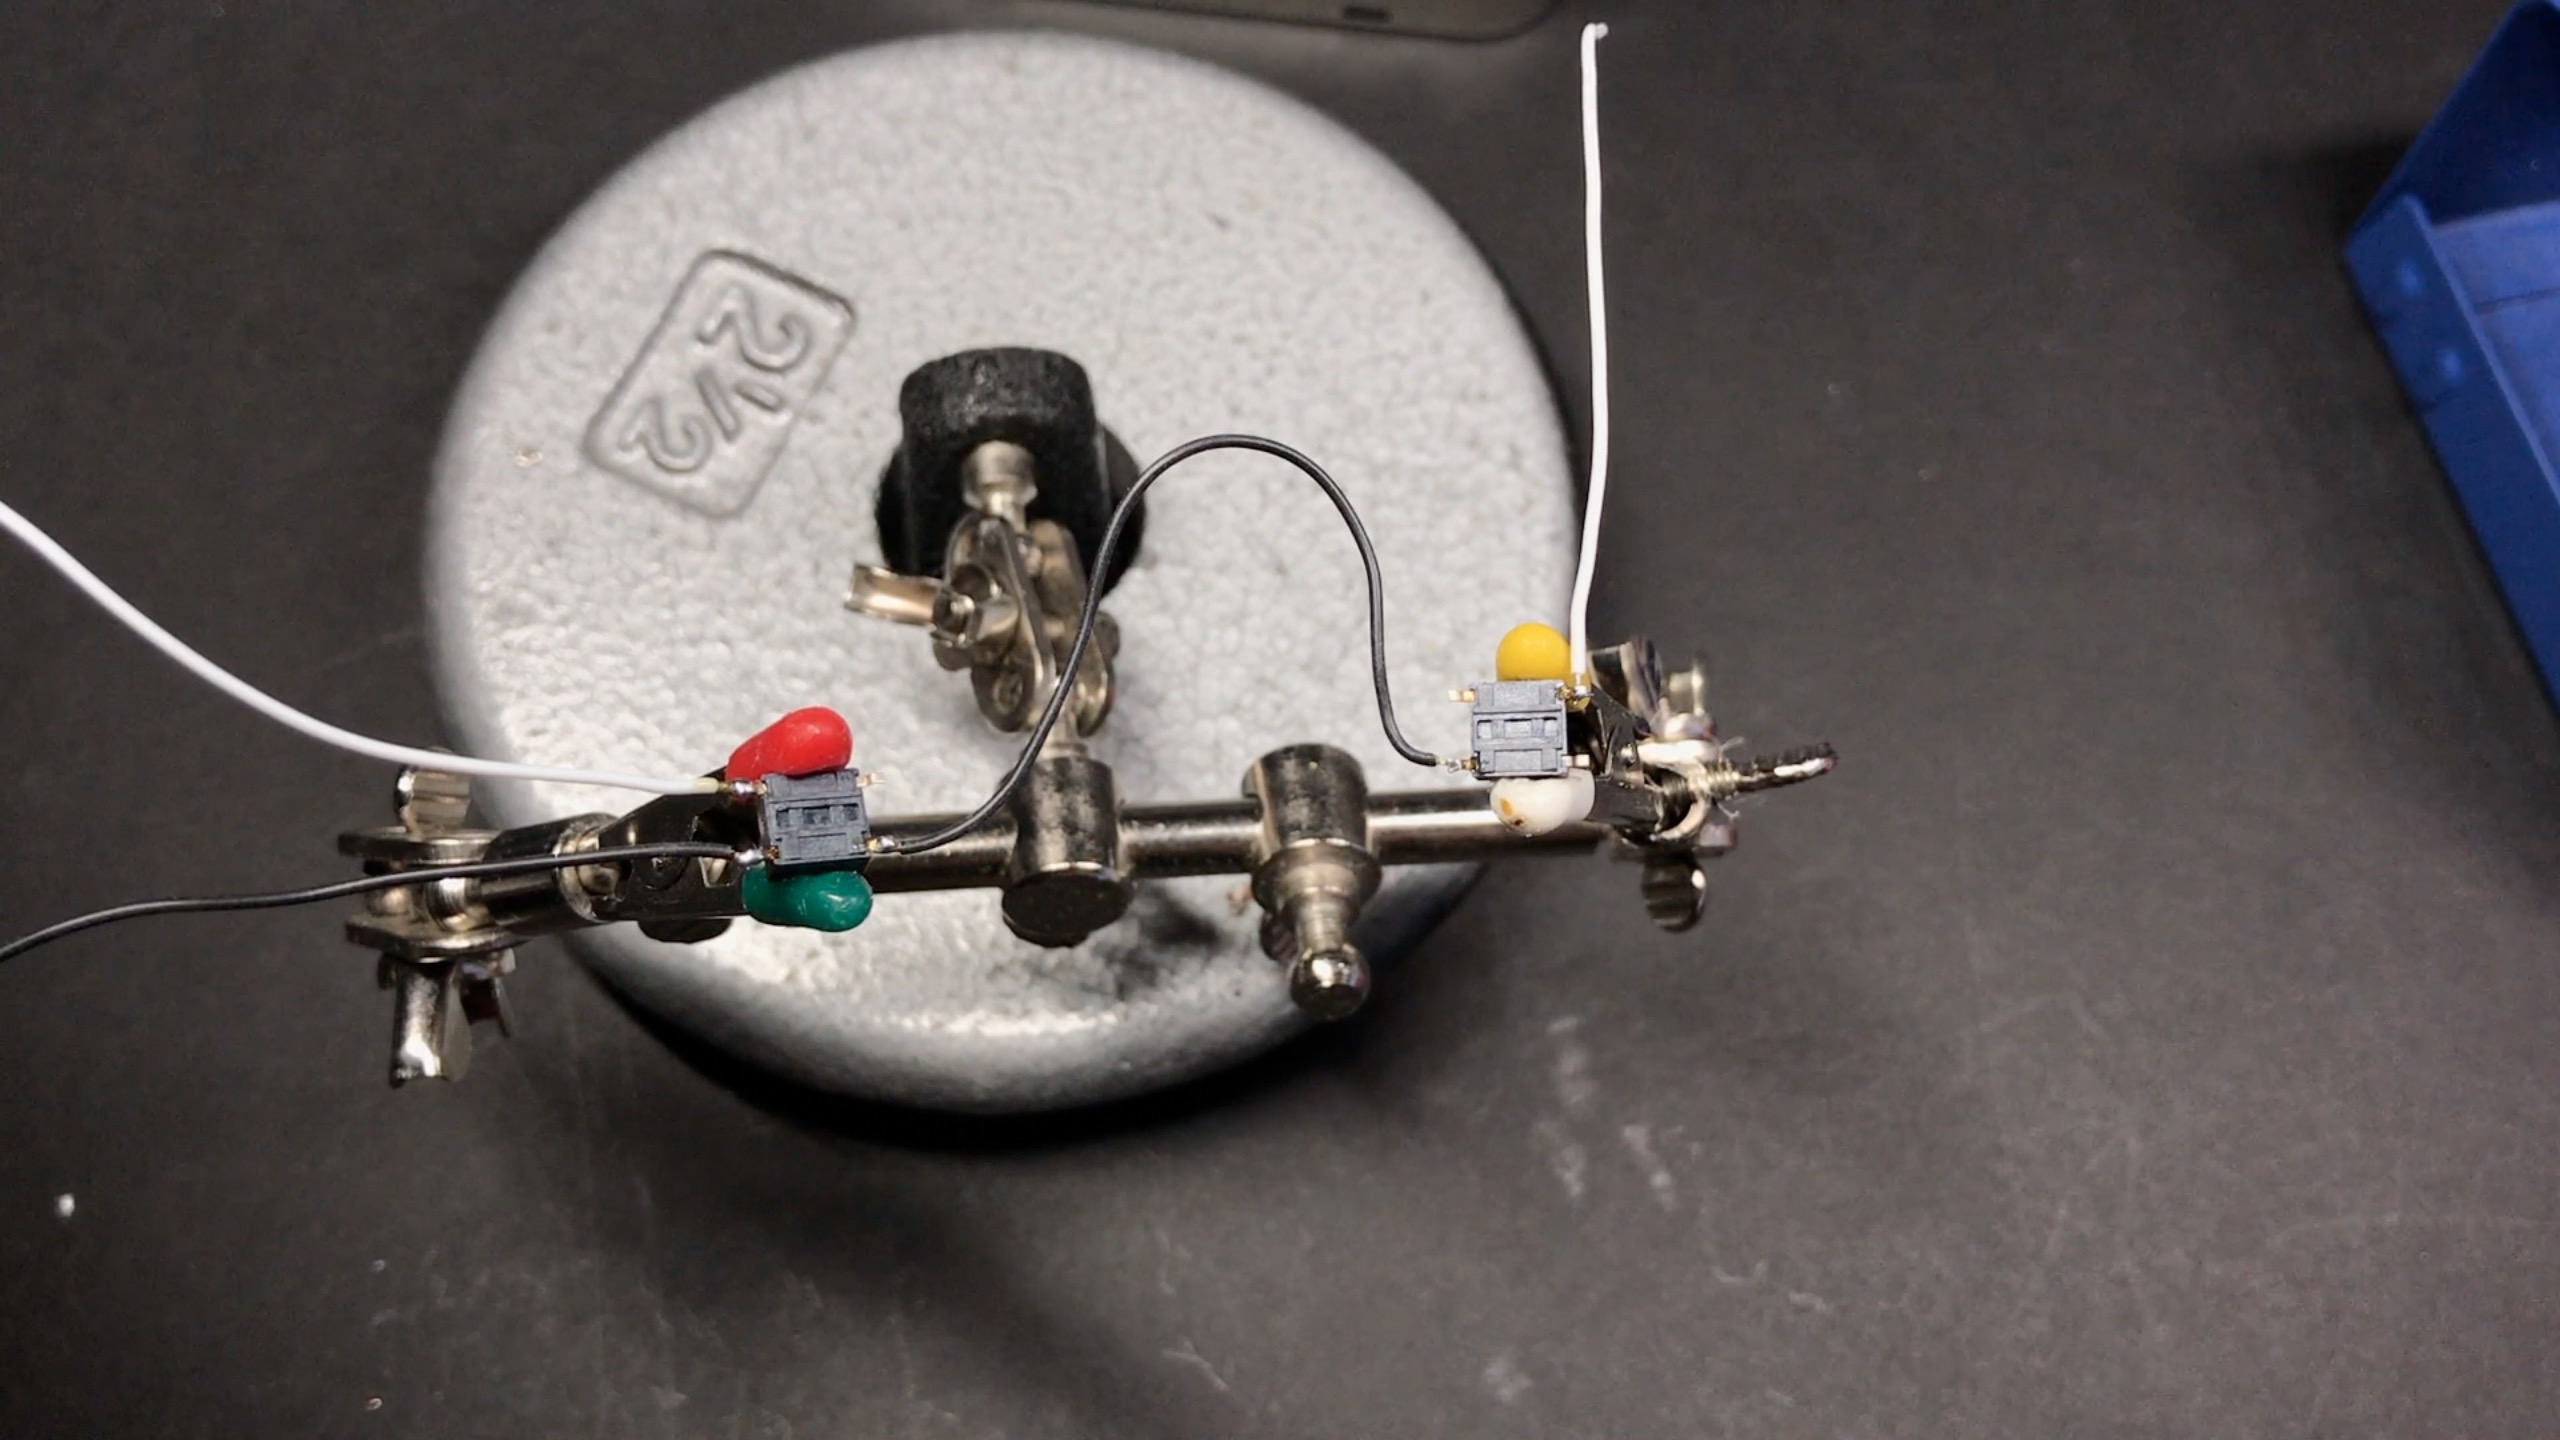
How do you wire the L/R buttons? From GRD to button to Pi?
Also I'm not getting my game pad detected? I have the GRD from the board to the pi and the battery. The battery is also charging at the moment. The retropie is not detecting my gamepad. Is there something I have to code or a file I have to add to get it to work?
Thanks again!
Chris
-
rodocop
- Posts: 1723
- Joined: Mon Aug 22, 2016 3:14 pm
- Location: Saskatchewan
- Has thanked: 606 times
- Been thanked: 608 times
Re: Cheaper PCB
Did you follow this guide? You will need to follow all the steps before the gamepad will be detected:lewsidius wrote: ↑Tue Aug 01, 2017 10:35 amI'm in Toronto and I find the same thing about the shipping as well
How do you wire the L/R buttons? From GRD to button to Pi?
Also I'm not getting my game pad detected? I have the GRD from the board to the pi and the battery. The battery is also charging at the moment. The retropie is not detecting my gamepad. Is there something I have to code or a file I have to add to get it to work?
Thanks again!
Chris
viewtopic.php?t=57
For L and R, see wermy's guide, the black wire is ground, white is what you would wire to the pi's GPIO's. You can use one ground for both buttons, which is why they are connected via the black wire.
As for ordering, I get lots from ebay/aliexpress/amazon. Stuff from china is cheap but takes forever. If I want adafruit products I buy from BC robotics. (online store, based in BC.) Shipping is about 13$, so if you order lots it's not too bad.
_____________________________________________________
My Minty Pi builds:
http://www.sudomod.com/forum/viewtopic.php?f=32&t=3628
My GBZ builds:
http://www.sudomod.com/forum/viewtopic. ... 813#p50813
My modded DMG-01's:
http://www.sudomod.com/forum/viewtopic.php?f=13&t=2696
My NESpi:
http://www.sudomod.com/forum/viewtopic.php?f=13&t=2941
My Gaboze Pocaio's
https://sudomod.com/forum/viewtopic.php?f=13&t=6063
My Minty Pi builds:
http://www.sudomod.com/forum/viewtopic.php?f=32&t=3628
My GBZ builds:
http://www.sudomod.com/forum/viewtopic. ... 813#p50813
My modded DMG-01's:
http://www.sudomod.com/forum/viewtopic.php?f=13&t=2696
My NESpi:
http://www.sudomod.com/forum/viewtopic.php?f=13&t=2941
My Gaboze Pocaio's
https://sudomod.com/forum/viewtopic.php?f=13&t=6063
Who is online
Users browsing this forum: No registered users and 1 guest