Page 3 of 6
Re: Glue Less Support Bracket for Kite's Mode/Power Switch Board
Posted: Wed Mar 14, 2018 7:24 am
by smoothoperator
This is what you need:
https://www.ebay.com/itm/33-FEET-3M-VHB ... 0290.m3507
Works great! Very strong stuff! I think the case would snap in half before the tape would fail! All credit to YaYa for the idea.
Re: Glue Less Support Bracket for Kite's Mode/Power Switch Board
Posted: Wed Mar 14, 2018 10:02 pm
by sygyzy
HoolyHoo - would you mind posting a photo of how the ButtonSupport piece is installed? I have both printed out and the ModerPowerBracket seems straightforward but I am not sure where to put the little ButtonSupport guy. Thank you.
Edit: One more question - with the bracket, the mode button is no longer centered in the hole in the case. In fact it's quite off. I will replace the momentary switch anyways for one with a longer button but is the expectation for users to solder in the new button with a lot of extension through the legs? In other words, not flush against the board like it the setup from Kite? Ah yes, I see in your description that's exactly what's going on.
Re: Glue Less Support Bracket for Kite's Mode/Power Switch Board
Posted: Thu Mar 15, 2018 6:47 am
by mrdude42
sygyzy wrote: ↑Wed Mar 14, 2018 10:02 pm
HoolyHoo - would you mind posting a photo of how the ButtonSupport piece is installed? I have both printed out and the ModerPowerBracket seems straightforward but I am not sure where to put the little ButtonSupport guy. Thank you.
Edit: One more question - with the bracket, the mode button is no longer centered in the hole in the case. In fact it's quite off. I will replace the momentary switch anyways for one with a longer button but is the expectation for users to solder in the new button with a lot of extension through the legs? In other words, not flush against the board like it the setup from Kite? Ah yes, I see in your description that's exactly what's going on.
I’m wondering the same thing. I can’t really see in the current pics how these two parts work to hold the buttons in place.
Re: Glue Less Support Bracket for Kite's Mode/Power Switch Board
Posted: Thu Mar 15, 2018 6:57 am
by HoolyHoo
mrdude42 wrote: ↑Thu Mar 15, 2018 6:47 am
sygyzy wrote: ↑Wed Mar 14, 2018 10:02 pm
HoolyHoo - would you mind posting a photo of how the ButtonSupport piece is installed? I have both printed out and the ModerPowerBracket seems straightforward but I am not sure where to put the little ButtonSupport guy. Thank you.
Edit: One more question - with the bracket, the mode button is no longer centered in the hole in the case. In fact it's quite off. I will replace the momentary switch anyways for one with a longer button but is the expectation for users to solder in the new button with a lot of extension through the legs? In other words, not flush against the board like it the setup from Kite? Ah yes, I see in your description that's exactly what's going on.
I’m wondering the same thing. I can’t really see in the current pics how these two parts work to hold the buttons in place.
After soldering the new, longer button, it will hang further down as I stated in my first post. The purpose of the second 3d part is to give the button the support it needs when pushing the button so that it doesn't bend in. Maybe this will make it clearer as to how it is supposed to be after install.
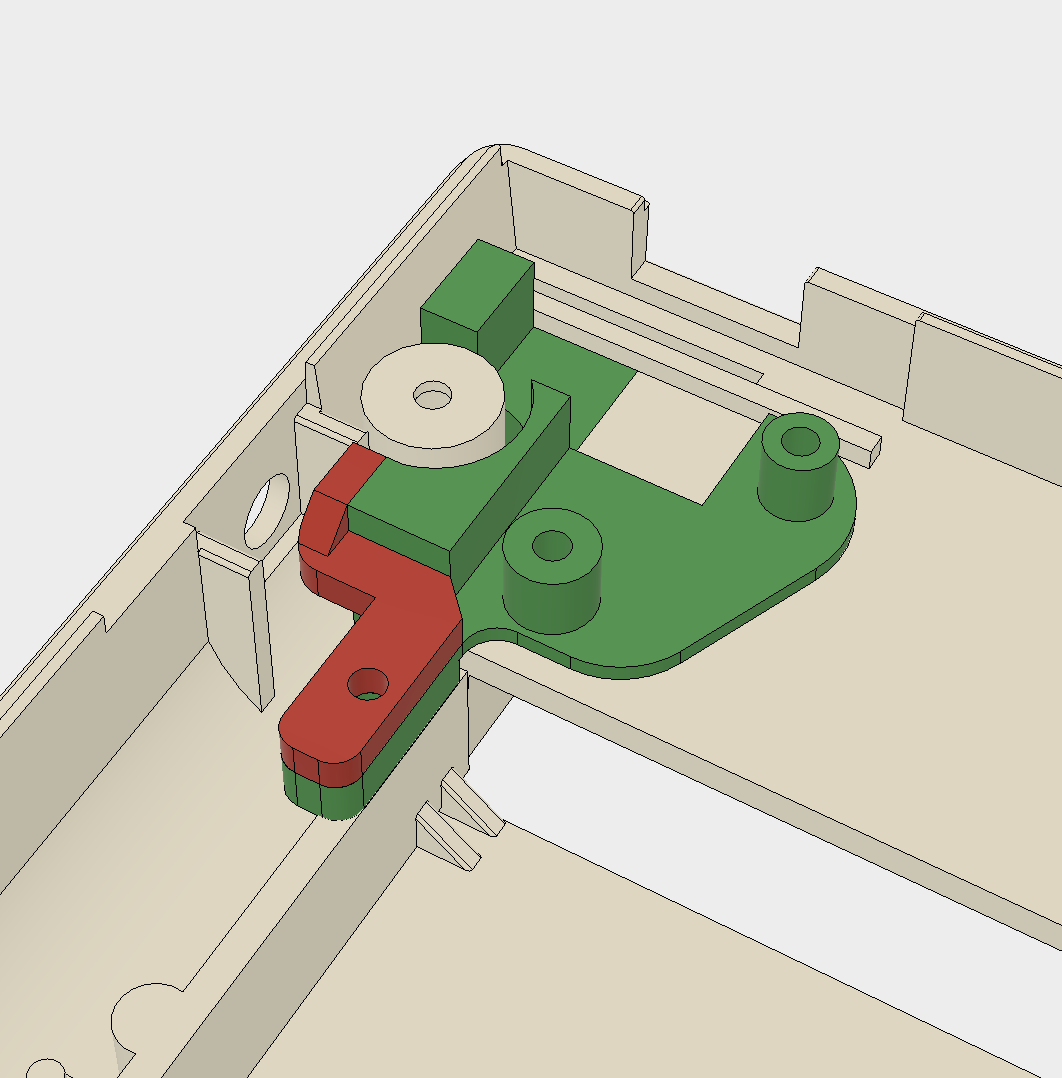
- GL.png (229.07 KiB) Viewed 15605 times
As you can see, without the "red" part, the button would have a gap and would not be stable when pushed. Originally, I had it as only one piece, but the problem with that was that trying to get the board and 3d part into that location was very difficult because of the angle the button needs to go when placing it. For ease and convenience, I opted for the current design.

Hope that helps.
Re: Glue Less Support Bracket for Kite's Mode/Power Switch Board
Posted: Thu Mar 15, 2018 10:45 am
by mrdude42
HoolyHoo wrote: ↑Thu Mar 15, 2018 6:57 am
mrdude42 wrote: ↑Thu Mar 15, 2018 6:47 am
sygyzy wrote: ↑Wed Mar 14, 2018 10:02 pm
HoolyHoo - would you mind posting a photo of how the ButtonSupport piece is installed? I have both printed out and the ModerPowerBracket seems straightforward but I am not sure where to put the little ButtonSupport guy. Thank you.
Edit: One more question - with the bracket, the mode button is no longer centered in the hole in the case. In fact it's quite off. I will replace the momentary switch anyways for one with a longer button but is the expectation for users to solder in the new button with a lot of extension through the legs? In other words, not flush against the board like it the setup from Kite? Ah yes, I see in your description that's exactly what's going on.
I’m wondering the same thing. I can’t really see in the current pics how these two parts work to hold the buttons in place.
After soldering the new, longer button, it will hang further down as I stated in my first post. The purpose of the second 3d part is to give the button the support it needs when pushing the button so that it doesn't bend in. Maybe this will make it clearer as to how it is supposed to be after install.
GL.png
As you can see, without the "red" part, the button would have a gap and would not be stable when pushed. Originally, I had it as only one piece, but the problem with that was that trying to get the board and 3d part into that location was very difficult because of the angle the button needs to go when placing it. For ease and convenience, I opted for the current design.
Hope that helps.
Perfect pic to illustrate how it works. This will be super useful for my next build. Thanks!!!
Re: Glue Less Support Bracket for Kite's Mode/Power Switch Board
Posted: Thu Mar 15, 2018 11:45 am
by sygyzy
This picture is amazing Hoolyhoo. You have done it again. Thank you!
For getting the proper height on the new momentary switch, do you recommend putting all the fixtures and board in place then kind of free floating the switch in place and then soldering it in place?
Re: Glue Less Support Bracket for Kite's Mode/Power Switch Board
Posted: Thu Mar 15, 2018 1:01 pm
by HoolyHoo
sygyzy wrote: ↑Thu Mar 15, 2018 11:45 am
This picture is amazing Hoolyhoo. You have done it again. Thank you!
For getting the proper height on the new momentary switch, do you recommend putting all the fixtures and board in place then kind of free floating the switch in place and then soldering it in place?
That is exactly the way I did it. I just tack soldered one leg to where I had it in the right place then disassembled the unit and finished properly soldering it.
Re: Glue Less Support Bracket for Kite's Mode/Power Switch Board
Posted: Sun Mar 25, 2018 10:25 pm
by smoothoperator
gilbertotron wrote: ↑Fri Mar 09, 2018 6:39 am
Hey smoothoperator, I'd love to see some pictures of what you've done, its sounds sweet.
Getting it difficult to picture exactly what you mean from your description alone. Thanks
Here you go..........

- IMG_4308.JPG (4.28 MiB) Viewed 15453 times

- IMG_4306.JPG (5.42 MiB) Viewed 15453 times
Re: Glue Less Support Bracket for Kite's Mode/Power Switch Board
Posted: Fri Mar 30, 2018 1:22 pm
by gilbertotron
Looking very very tidy bro! Nice, thanks for the pix.
Re: Glue Less Support Bracket for Kite's Mode/Power Switch Board
Posted: Fri Mar 30, 2018 2:18 pm
by sygyzy
Hi, I finally got everything fitted thanks for the pictures above and it works great. My button has a nice backing and pushing it in doesn't cause and shifting. However, I am having a simple problem and I am wondering if anyone else is facing it as well. The screw that goes through the red and green part is not long enough to reach the hole in the case. In other words, the 3d printed parts are too thick. I am confident the prints I made are accurate to the 3D models. I also got extra sets of Gameboy DMG screws and even with slight variances, none of the threading seems to catch into the case slot.
Right now, the setup is pretty stable but only because it's being held stiff by the screw. This provides some support but you can easily wiggle the green/red section side to side. Nothing is tightened.
Is there a comparable screw size someone can recommend? Thread size and length would be appreciated.
Thanks in advance.