Hey Guys, been watching the forums for awhile and finally decided to take the leap into making my first gameboy zero.
I did already get the following parts: (electronics atleast)
Gameboy black case w/ buttons
gameboy zero button PCB
Tachometer
Adafruit powerboost 1000c
Battery
Adafruit Mono 2.5w
Speaker
Switchs/and buttons
LEDs, resisters, etc.
I hooked up and tested the PCB button board and confirmed that to be working properly, so thats checked off.
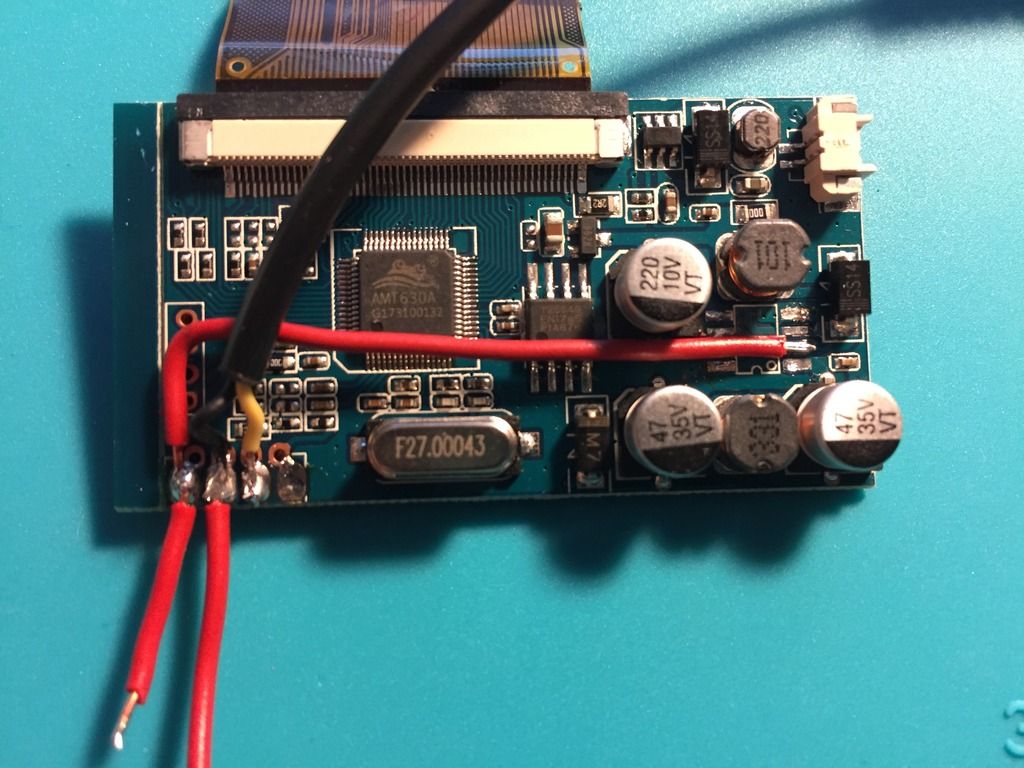
Then my next step I am however currently having an issue with getting the LCD to work. I have the BW variant 7 which i original tested when i got it and was fine (SSB on N64). However after doing option B (not removing the chip) I am booting to only a black screen on the display. I did both 5v from the 2 pin the the pi zw, as well as using my bench PSU set at 5.2v. I then removed the extra wire to attempt to retest at 12v with my bench PSU but still giving black display. For all these test I have been doing with a N64 which i know for sure is output display. At this point this has been my second BW display (first one being V8 but failed to test when i got it and was defective out the box), and honestly getting bummed about getting another display from BW.
The LCD is powering on but shows no display, staying on black.
So I guess the first advice i would like to ask is what is a good 3.5inch display to get that is already 5v and maybe already hdmi ready so i can just plug and play? I wanted to have this tested and out of the way first before I move on to testing the other parts. Amazon Prime is ideal.
After the LCD I will end up doing the speaker hook up to make sure thats running properly. And I also do plan on just simply doing the direct slide switch onto the powerboost and just keep it simple for now instead of investing in the safe shutdown. Ill just manually shutdown before turning off.
Any help will be great and going to try and order the LCD today to get hopefully by Sat.
Thinking about getting this LCD, its touch but not planning on using it since there will be another glass ontop
https://www.amazon.com/gp/product/B01N4 ... _qh_dp_hza
First Build, hitting walls (updated to Audio)
-
GreenTeaDragon

- Posts: 6
- Joined: Tue Feb 13, 2018 7:32 am
- Been thanked: 1 time
First Build, hitting walls (updated to Audio)
Last edited by GreenTeaDragon on Mon Aug 27, 2018 3:35 pm, edited 1 time in total.
-
VeteranGamer

- Posts: 1738
- Joined: Thu Jan 26, 2017 11:12 am
- Location: London, UK
- Has thanked: 528 times
- Been thanked: 909 times
Re: First Build, hitting walls
if the screen worked...
then id assume its still fine.....
you may have done the 5V mod incorrectly.....
or you may have wired it up to the Pi incorrectly.....
if you post some pics of what you've actually done, it may assist a little.....
as you'd be surprised some times its just the littlest of things setting you back....
personally idk why people are still messing around with the backup camera screen....
i appreciate they may be a little easier to get hold of in some parts of the world....
but the whole 5V mod aspect and the fact that its a gamble on which variant you might receive is just pointless now...
Gearbest do a very decent screen for these build, which doesn't require a 5V mod and is of a decent price
(and they ship to nearly everywhere in the world)
https://www.gearbest.com/development-bo ... pQQAvD_BwE
the Gearbest screen is the only composite screen to go for.....
.
-
GreenTeaDragon
- Posts: 6
- Joined: Tue Feb 13, 2018 7:32 am
- Been thanked: 1 time
Re: First Build, hitting walls
Thanks for the response, currently at work so I am limited on uploaded pictures
I did also see the LCD you mentioned through the forums but still confused. Says it's 12v operating volts, but it's 5v out the box?
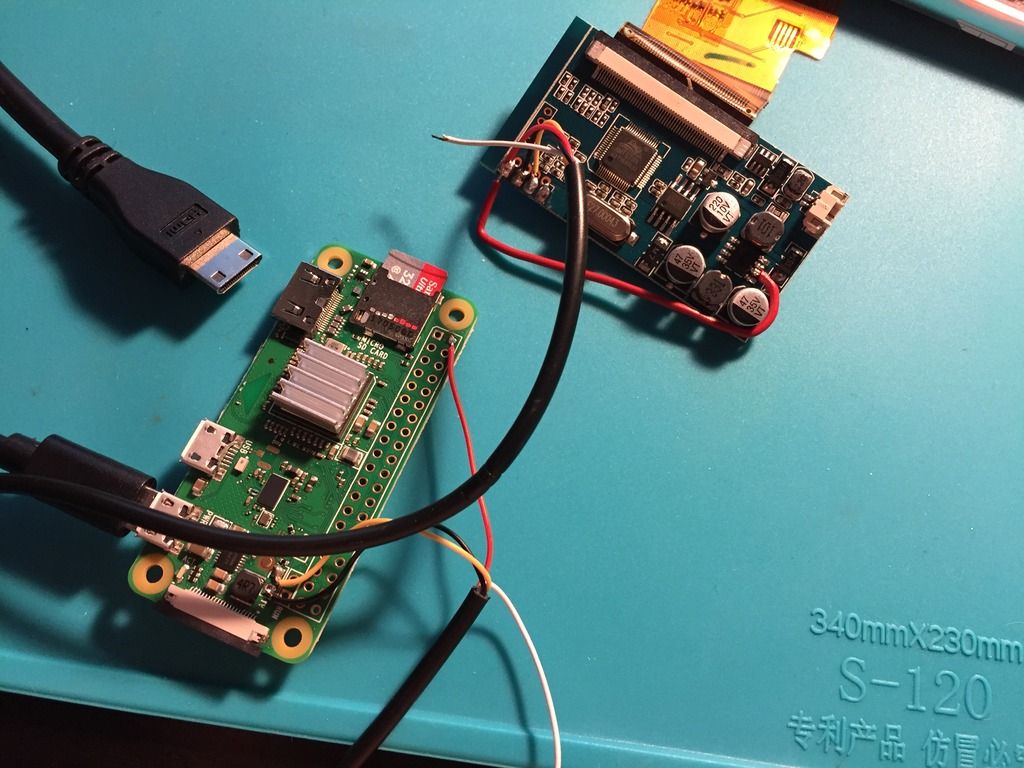
And as far as the pi being wired, I even put back on the composite plug and used a N64 input for video testing. Which is not shown in the picture. Used the yellow and black wires for that.

I did also see the LCD you mentioned through the forums but still confused. Says it's 12v operating volts, but it's 5v out the box?
And as far as the pi being wired, I even put back on the composite plug and used a N64 input for video testing. Which is not shown in the picture. Used the yellow and black wires for that.
-
rodocop

- Posts: 1723
- Joined: Mon Aug 22, 2016 3:14 pm
- Location: Saskatchewan
- Has thanked: 606 times
- Been thanked: 608 times
Re: First Build, hitting walls
As far as the wiring goes, it seems fine....When you reconnected the composite plug and hooked up the N64, did it work again, or no?
Make sure to check there are no bridged connections beside that wire soldered to the IC, and check the same on yellow and black wires to the pi.
You could also try to swap the white and yellow. Did this screen come with a button board? plug it in and see if you can control brightness or anything like that?
I also second the gearbest screen, it may say it's rated for 12V but will run off 5V with no modifications. Those are the only composite screens I ever use.
_____________________________________________________
My Minty Pi builds:
http://www.sudomod.com/forum/viewtopic.php?f=32&t=3628
My GBZ builds:
http://www.sudomod.com/forum/viewtopic. ... 813#p50813
My modded DMG-01's:
http://www.sudomod.com/forum/viewtopic.php?f=13&t=2696
My NESpi:
http://www.sudomod.com/forum/viewtopic.php?f=13&t=2941
My Gaboze Pocaio's
https://sudomod.com/forum/viewtopic.php?f=13&t=6063
-
GreenTeaDragon
- Posts: 6
- Joined: Tue Feb 13, 2018 7:32 am
- Been thanked: 1 time
Re: First Build, hitting walls
Did not work again after connecting the 64 after the fact again. Also connected the buttons with no change and also did swap the white side wiring. Currently at work but when I soldered to the leg I checked after the fact for bridging and did not.
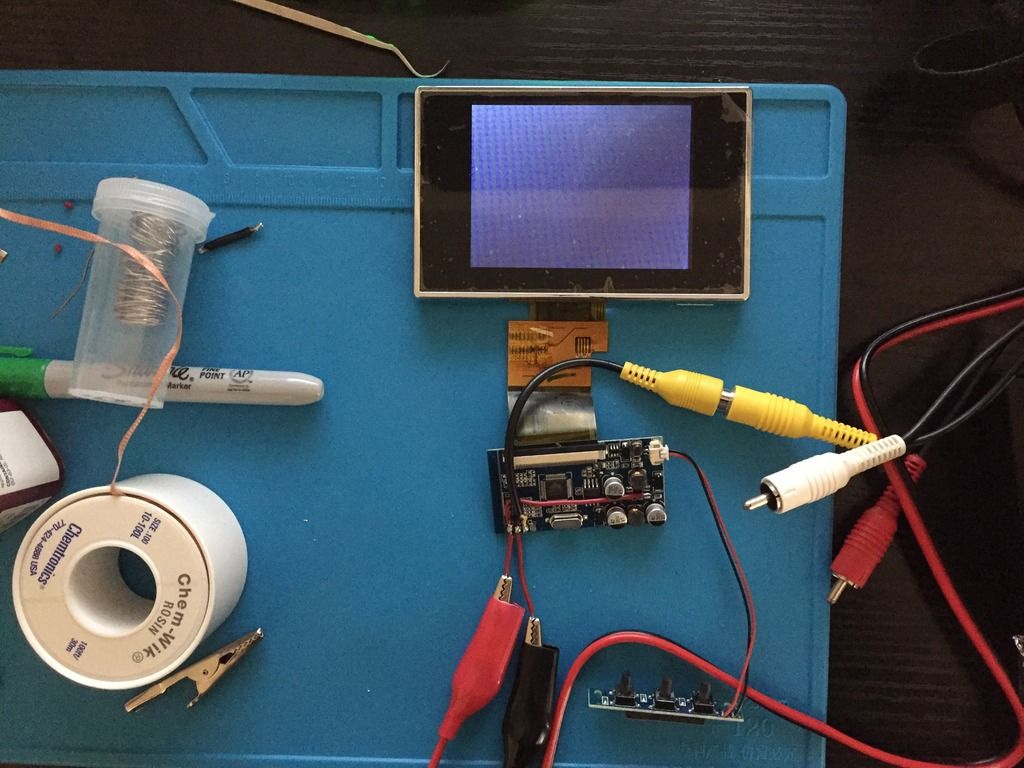
Also did order last night that LCD I put in the earlier post but going to order the gearbest anyways lol. I'll use the other touchscreen for bench testing. Just sucks to wait another 2 weeks for the gearbest.
When I get home I'll do another check on the soldering job.
Also did order last night that LCD I put in the earlier post but going to order the gearbest anyways lol. I'll use the other touchscreen for bench testing. Just sucks to wait another 2 weeks for the gearbest.
When I get home I'll do another check on the soldering job.
-
rodocop
- Posts: 1723
- Joined: Mon Aug 22, 2016 3:14 pm
- Location: Saskatchewan
- Has thanked: 606 times
- Been thanked: 608 times
Re: First Build, hitting walls
also, try to remove the 5V mod, and power it with 12V, that would let you know if there is an issue with the 5V modification.
_____________________________________________________
My Minty Pi builds:
http://www.sudomod.com/forum/viewtopic.php?f=32&t=3628
My GBZ builds:
http://www.sudomod.com/forum/viewtopic. ... 813#p50813
My modded DMG-01's:
http://www.sudomod.com/forum/viewtopic.php?f=13&t=2696
My NESpi:
http://www.sudomod.com/forum/viewtopic.php?f=13&t=2941
My Gaboze Pocaio's
https://sudomod.com/forum/viewtopic.php?f=13&t=6063
My Minty Pi builds:
http://www.sudomod.com/forum/viewtopic.php?f=32&t=3628
My GBZ builds:
http://www.sudomod.com/forum/viewtopic. ... 813#p50813
My modded DMG-01's:
http://www.sudomod.com/forum/viewtopic.php?f=13&t=2696
My NESpi:
http://www.sudomod.com/forum/viewtopic.php?f=13&t=2941
My Gaboze Pocaio's
https://sudomod.com/forum/viewtopic.php?f=13&t=6063
-
GreenTeaDragon
- Posts: 6
- Joined: Tue Feb 13, 2018 7:32 am
- Been thanked: 1 time
Re: First Build, hitting walls
Yeah, that was the first thing i did, revert back to 12v, but there was no change in that.
Also note its been awhile since i tested this LCD. Not sure what could have gone wrong since I kept it wrapped and boxed. But anyways, decided what the hell, and removed the IC completely at this point to make it more clean. However this still didn't change anything at all. Thinking this thing is toast somehow
I haven't gotten any other LCDs yet but hope this shows others, don't bother being cheap for just another $5-8 bucks lol.
Also to update, the touchscreen comes in tomorrow before the end of day (so i can atleast start the config) and Gearbest LCD just got shipped out now.
I also did want to ask you guys, if you have your own 3d printers or just end up purchasing all these parts? If you have your own, whats a good printer kit? Always been afraid of getting the wrong one or something overly complex.
Also note its been awhile since i tested this LCD. Not sure what could have gone wrong since I kept it wrapped and boxed. But anyways, decided what the hell, and removed the IC completely at this point to make it more clean. However this still didn't change anything at all. Thinking this thing is toast somehow


I haven't gotten any other LCDs yet but hope this shows others, don't bother being cheap for just another $5-8 bucks lol.
Also to update, the touchscreen comes in tomorrow before the end of day (so i can atleast start the config) and Gearbest LCD just got shipped out now.
I also did want to ask you guys, if you have your own 3d printers or just end up purchasing all these parts? If you have your own, whats a good printer kit? Always been afraid of getting the wrong one or something overly complex.
-
GreenTeaDragon
- Posts: 6
- Joined: Tue Feb 13, 2018 7:32 am
- Been thanked: 1 time
Re: First Build, hitting walls
So another wall I'm hitting is now I can't get the audio to come out of the speaker. It will always output sound through HDMI (via booting logo sound).
Doing the method of PWN0 (pin 12) to Adafruit mono amp A+ input (A- set to pi ground). I have used the command at the end of config.txt:
dtoverlay=pwm-2chan,pin=18,func=2,pin2=13,func2=4
and enabled 12C in settings as well as set auto output to 3.5mm instead of HDMI. Also using the pi's 5v and ground to power the mono amp. Also even forced via command to do the same with:
sudo amixer cset numid=3 1
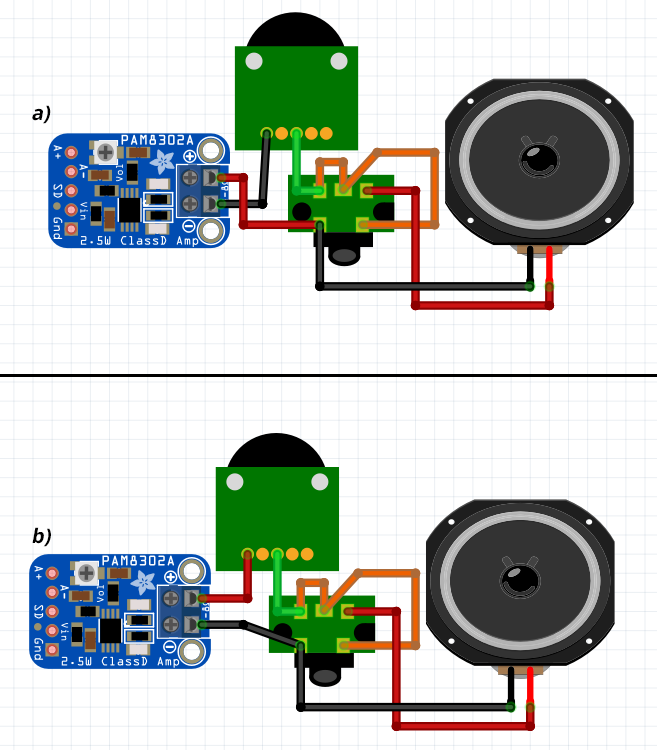
I'm also using this diagram i found to wire the headphone jack and speaker (A).
What is puzzling me is that its still using HDMI audio for the boot screen and can't be changed. I am using currently using a Raspberry Pi 3 instead of a Zero so i avoid doing additional soldering to it until testing is done. I haven't done any emulated game testing since i thought the boot screen should be enough of a test of sound to confirm function. I am using a HDMI connection to my monitor for viewing.
Doing the method of PWN0 (pin 12) to Adafruit mono amp A+ input (A- set to pi ground). I have used the command at the end of config.txt:
dtoverlay=pwm-2chan,pin=18,func=2,pin2=13,func2=4
and enabled 12C in settings as well as set auto output to 3.5mm instead of HDMI. Also using the pi's 5v and ground to power the mono amp. Also even forced via command to do the same with:
sudo amixer cset numid=3 1
I'm also using this diagram i found to wire the headphone jack and speaker (A).

What is puzzling me is that its still using HDMI audio for the boot screen and can't be changed. I am using currently using a Raspberry Pi 3 instead of a Zero so i avoid doing additional soldering to it until testing is done. I haven't done any emulated game testing since i thought the boot screen should be enough of a test of sound to confirm function. I am using a HDMI connection to my monitor for viewing.
Who is online
Users browsing this forum: No registered users and 1 guest